
The Grasslin Timer Instructions Manual provides essential guidance for installing, programming, and troubleshooting Grasslin timers. It ensures optimal performance, safety, and helps users master all timer features effectively.
1.1 Overview of the Grasslin Timer
The Grasslin Timer is a versatile and reliable time-switching device designed for various applications, including defrost timers and general-purpose timing. It offers automatic and manual override modes, allowing users to control electrical devices efficiently. With programmable features, the timer supports pre-set and custom programs, catering to specific needs. Available in models like the DTAV40 and GM40AV series, Grasslin timers are known for their durability and precision. They are widely used in commercial and industrial settings, ensuring accurate time management and energy efficiency.
1.2 Importance of Following the Manual
Adhering to the Grasslin Timer manual ensures proper installation, operation, and maintenance, preventing potential damage from misuse. It outlines safety precautions, warranty terms, and troubleshooting steps, reducing risks of accidents or voiding the warranty. Following the manual guarantees optimal performance, extends the product’s lifespan, and helps users avoid costly repairs. It also guides programming and custom settings, ensuring the timer functions as intended for specific applications, whether defrost timing or general-purpose use.

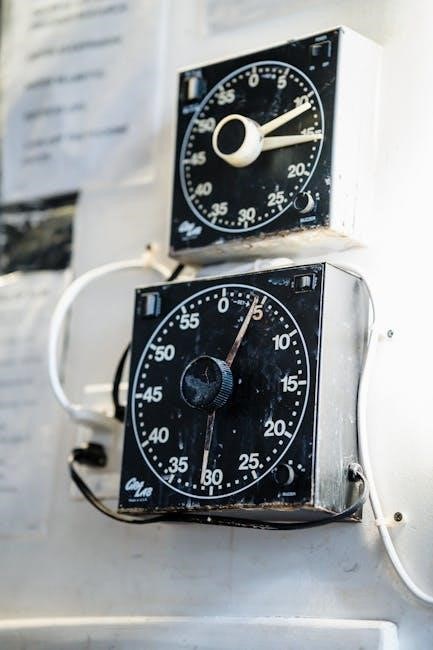
Understanding the Automatic Mode and Timer Override Switch
The Timer Override Switch enables seamless operation between automatic and manual modes. In AUTOMATIC, the timer controls functions based on set programs, while the manual override allows direct control, ensuring flexibility in operation.
2.1 Setting the Timer to Automatic Mode
To set the timer to automatic mode, ensure the Timer Override Switch is in the AUTOMATIC position. This allows the timer to operate based on programmed settings. Verify the day of the week is correctly set, as flashing day indicators mean the day was not properly configured. Once set, the timer will automatically execute scheduled programs without manual intervention. Proper alignment of the timer’s tabs or pins with the desired schedule ensures accurate automatic operation. Always refer to the manual for specific alignment instructions to avoid errors.
2.2 Functions of the 3-Way Manual Override
The 3-way manual override switch offers three distinct operational modes. In the middle position, the timer operates automatically, adhering to programmed schedules. The top position (1) enables manual override, allowing control of the connected device via the float switch. The bottom position (0) turns the timer off, disconnecting power to the device. This feature provides flexibility for manual intervention while maintaining automatic functionality when desired. Proper use ensures seamless switching between modes for optimal control and convenience.
Programming the Grasslin Timer
The Grasslin Timer allows users to program schedules using pre-set programs or create custom ones. This flexibility ensures tailored control over connected devices, optimizing performance and convenience.
3.1 Using Pre-Set Programs
Using pre-set programs on the Grasslin Timer offers convenience and simplicity. These programs are designed for common scheduling needs, allowing users to select and activate them effortlessly. The timer’s pre-set options cover a variety of scenarios, ensuring efficient control of connected devices. Simply navigate through the menu, choose the desired program, and confirm your selection. This feature saves time and effort, especially for users who prefer a plug-and-play approach. The manual provides clear instructions on how to access and utilize these programs effectively, ensuring smooth operation from the start.
3.2 Creating Custom Programs
Creating custom programs on the Grasslin Timer allows users to tailor settings to specific needs. The timer supports up to 20 memories, enabling detailed scheduling. Users can define start times, durations, and days of the week for each event. The manual guides through selecting new programs, assigning channels, and setting times. This flexibility ensures precise control over connected devices, making it ideal for unique operational requirements. Custom programs can be reviewed, modified, or deleted as needed, ensuring adaptability and efficient management of schedules. This feature enhances the timer’s functionality for specialized applications.
Installation and Wiring Guidelines
Fix the timer to the socket box and connect wiring according to the diagram. Ensure secure connections, avoiding mixed solid and flexible conductors in terminals for reliability.
4.1 Fixing the Timer to the Socket Box
To securely install the Grasslin timer, remove the front ring and align the timer with the socket box. Gently push the timer into place and secure it using the provided screws. Ensure the timer is flush with the socket box for proper fitment. Next, connect the wiring according to the diagram, avoiding any mixed solid and flexible conductors in the same terminal. Double-check all connections for accuracy and safety before powering on the system.
4.2 Connecting the Wiring According to the Diagram
Refer to the wiring diagram provided in the manual for precise connections. Ensure the power supply is turned off before starting. Connect the live, neutral, and earth wires to the corresponding terminals on the timer. Avoid mixing solid and flexible conductors in the same terminal. Tighten all connections securely to prevent loose wiring. Once all wires are connected, turn the power back on and test the timer to ensure proper functionality. This step is crucial for safe and reliable operation of the Grasslin timer system.
Troubleshooting Common Issues
Flashing day indicators signal improper setup. Verify the day of the week and time are correctly set. If issues persist, check wiring connections and consult the manual for further guidance.
5.1 Resolving Flashing Day Indicators
Flashing day indicators typically occur when the timer’s day of the week isn’t set correctly. To resolve this, ensure the current day is properly selected during the initial setup. If the issue persists, check the timer’s battery or power supply. Additionally, verify that all programming steps were followed accurately. If problems continue, refer to the troubleshooting section in the manual or contact technical support for assistance. Proper synchronization of the day and time is crucial for optimal timer performance.
5.2 Addressing Mechanical Timer Setup Problems
Mechanical timer issues often arise from incorrect setup. Ensure the timer is properly aligned with the socket box and all connections are secure. Avoid rotating the outer dial to set the time, as this can damage the mechanism. Instead, use the designated controls for adjustments. Verify that the day of the week and time are correctly set. If problems persist, check the power supply and ensure the timer is mounted level. Refer to the manual for detailed alignment and calibration steps to resolve mechanical setup issues effectively.
Product Models and Replacements
This section covers replacing existing defrost timers, compatibility with Paragon and Precision models, and guidelines for ensuring correct replacements to maintain optimal functionality and performance.
6.1 Replacing Existing Defrost Timers
Replacing existing defrost timers with Grasslin models ensures compatibility and optimal performance. The DTAV40 model replaces Paragon 8040, 8140, 8240, and Precision 6040, 6140 series. Ensure the new timer matches the original specifications for voltage and current ratings. Disconnect power before installation and follow wiring diagrams carefully. Proper handling prevents damage to the unit. Use only authorized Grasslin replacement parts for reliability. Refer to the manual for specific instructions tailored to your model to avoid voiding the warranty and ensure safe operation.
6.2 Compatibility with Paragon and Precision Models
Grasslin timers are designed to seamlessly integrate with Paragon and Precision models, ensuring backward compatibility. The DTAV40 model directly replaces Paragon 8040, 8140, and 8240 series, as well as Precision 6040 and 6140 series. This compatibility allows for a straightforward upgrade without additional modifications. Users can retain existing wiring configurations, simplifying the installation process. Always verify the model and specifications before replacement to ensure proper functionality. Grasslin timers maintain the same performance standards as their predecessors, offering reliable operation and extended product lifespan.

Accessing Grasslin Timer Manuals
Grasslin timer manuals are available in PDF format for free download from official websites or platforms like Scribd. Ensure to download from reliable sources for accurate information.
7.1 Downloading PDF Manuals
Grasslin timer manuals are readily available for download in PDF format from official Grasslin websites and trusted platforms like Scribd. Users can access detailed instructions, diagrams, and troubleshooting guides by searching for their specific timer model. Ensure to verify the source for authenticity to avoid outdated or incorrect information. Downloading the PDF manual allows users to easily navigate and reference the guide offline, making it a convenient option for installation, programming, and maintenance tasks.
7.2 Navigating the Digital Socket Box Timer Manual
The digital socket box timer manual offers a comprehensive guide for users to navigate its features. It includes detailed sections on installation, programming, and troubleshooting, with clear diagrams and step-by-step instructions. Users can easily find specific information using the table of contents or index. The manual also covers safety precautions and maintenance tips, ensuring optimal use of the timer. By following the manual, users can unlock all functionalities and resolve common issues efficiently, making it an indispensable resource for both novices and experienced users.
Safety Precautions and Maintenance
Adhere to safety guidelines to prevent accidents and ensure the timer’s longevity. Regular maintenance, like checking connections, is crucial for optimal performance and safety. Follow all instructions carefully.
8.1 General Safety Instructions
To ensure safe operation, always disconnect power before performing maintenance or repairs. Avoid exposing the timer to water or extreme temperatures. Secure all connections properly to prevent electrical hazards. Use only genuine replacement parts to maintain safety standards. Follow the wiring diagram provided in the manual to avoid incorrect connections. Keep the timer clean and free from dust to prevent malfunctions. Never attempt repairs without proper training or tools. Adhere to local electrical regulations and guidelines for installation and operation. This ensures reliability and safety for optimal performance.
8.2 Repair and Replacement Guidelines
For repairs, always use genuine Grasslin spare parts to maintain safety and performance. Disconnect power before starting any maintenance. Refer to the wiring diagram for correct connections. Replace faulty components promptly to prevent further damage. If unsure, consult a qualified technician. Regularly inspect and clean contacts to ensure reliability. Damages caused by improper repairs or non-compliance with manual instructions may void the warranty. Follow the manual’s guidelines for replacing defrost timers or mechanical components. Test the timer after repairs to ensure proper function before restoring power.

Additional Resources and Support
Visit the official Grasslin website for downloadable manuals, troubleshooting guides, and FAQs. Contact technical support for personalized assistance with timer-related queries or complex issues.
9.1 Online Resources for Grasslin Timers
Grasslin offers a variety of online resources, including downloadable PDF manuals for models like GM40AV and DTAV40E. Their website provides installation guides, troubleshooting tips, and FAQs. Users can access detailed programming instructions, wiring diagrams, and user guides. Additionally, platforms like Scribd and official distributors offer manuals and support documents. These resources ensure easy access to information for optimal timer functionality and maintenance, catering to both new and experienced users seeking to resolve issues or understand advanced features.
9.2 Contacting Technical Support
For assistance with Grasslin timers, contact technical support through their official website or authorized distributors. Support teams are available to address troubleshooting, repairs, and programming issues. Users can also access contact details in the provided manuals or through online resources like Scribd. Ensure to provide model numbers and specific issues for efficient support. Grasslin’s customer service aims to resolve queries promptly, ensuring optimal functionality and user satisfaction with their timer products.
Leave a Reply
You must be logged in to post a comment.